We will see how to install Bridge Linux (a popular derivation of Arch Linux).
1.Prepare the setup disk.
- Download the latest Bridge Linux version from here. (I’m using the 2013-06 KDE version)
- Then make a bootable USB drive using unetbootin or simply write it to a DVD.
- Insert the bootable device with Bridge Linux setup and reboot the computer.
When the system boots in, you will see an environment like this.

Select “Boot Bridge Linux” to go into Bridge Linux.
Then you will have this type of a Desktop. This is the default KDE Desktop and you might get a different interface depending on what desktop environment you’ve selected on Step 1-1.

Go through the stuff you see and take a look at what you’ve got.
There are two icons on the desktop named “Install Bridge Linux” and “Read Me”. Keep the Read Me file safe as you’ll need it after the installation.
2.Installation
Double click on the “Install Bridge Linux” icon to run the setup. And you will be directed to select the language of the setup. Select your preference using arrow keys and press enter. (I’m using English).
Double click on the “Install Bridge Linux” icon to run the setup. And you will be directed to select the language of the setup. Select your preference using arrow keys and press enter. (I’m using English)

Then press enter on the welcome screen you get after that and by pressing enter, you will be prompted to the Main Menu of the setup.

You have to go through all these steps carefully in order to complete the installation.
- Set date and time
- First you have to select the date-time mode

2-1-3-Date and Time Select UTC if you only run Arch on your computer as this option will change the hardware clock of the system. Select localtime if you have another OS running. (I’ll select localtime as I don’t have another OS.)
- Select a region

2-1-4-Region Select your region. I’m selecting Asia.
- Select a time zone

2-1-5-TimeZone I’m selecting Colombo.
- Set the date
- Set the time
- First you have to select the date-time mode
- Disk(s) preparation

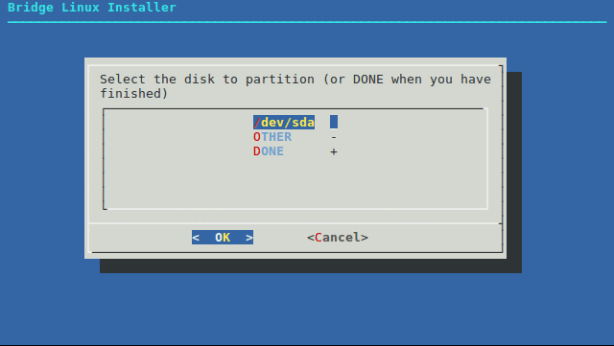
2-2-1-Partitions - Then you will shown the available disks on the system. Press enter to continue.
- Select the intended disk to proceed with the installation.
- Then you will be directed to the partition manager.

2-2-3-1-Partitioning New = Create a new Partition. (Create a Primary Partition for the Linux Installation.)
It is recommended to create a SWAP Partition. To make a partition SWAP, change the type of the partition to SWAP. (It will be used or Virtual Memory)
Don’t forget to make the Primary Partition Bootable and Write the Partition table. - Then you will be prompted back to step 2-2 of the main menu. Select DONE when you finished the partitioning.
- Now you will be prompted to select the SWAP Partition.

2-2-5-Partition To Use SWAP If you did not create a SWAP partition, select it or if you haven’t created one, select NONE.
- In the next step, you have to select a partition for root.
- Now you have to select a file system for root partition.

2-2-7-File System for root It;s recommended to choose ext4.
- Then you will be asked to format the partition. Select YES and proceed.
- Next, you may select partitions to be auto mounted. You can skip this step by selecting DONE.
- Now it will ask you for the confirmation. If everything is okay, you can select YES or go back anytime and change things.
- Then you will be prompted back to main screen on partitioning and select Main Menu to proceed with other settings.
- Install System

3-1-1-Installation - Configure the system
After the system installed successfully, you have to configure the system.
4-1-Configuration Menu - Root password
select it and enter the root password. - User Name
Select and enter the default user name and it’s password. - Configure
You can go to this option and do optional changes, such as hostname, locale,fstab etc.
4-2-Other Configurations Now you can finish the configuring by selecting Back. Then the settings will be applied.
- Root password
- Install Bootloader
Final Step is to install the boot loader and Select it to proceed.- Select GRUB as the boot loader.
- Then select the disk you need to install the GRUB. (It’s /dev/sda in my case as with many others.)
- After it completes, you are ready with the system. Now you can Quit the setup.
You can keep trying the Live CD or restart the system to boot into your installed system. (Remember to remove the bootable media.)
This is the log in screen you will see after restarting the computer.

PS : If you don’t see a Turn Off or Restart option, go to the terminal and run $ sudo shutdown -r 0 . It will restart the computer.


